Wednesday, December 29, 2010

Jumpstarting The Project

Finally, after months of hibernating, this project gets its long awaited jumpstart. My reason of neglecting this project is classic cliché: busy with work. Hey, if you can pay someone else to do the job while saving a little extra cash for you, why not?

Anyway, as it was last year, i get to go back home for Christmas last week. With work easing up a bit, i decided that it's time get the project rolling again. The project halted when i was working on the ECU and engine wiring. Now realizing that it's impossible for me to wire them myself and finish in time before i get bored, i decided to let the expert do the work. Only this time, i add a little twist..

Meet Megasquirt. Megasquirt is basically a DIY fully-programmable standalone ECU system developed by Bruce Bowling and Al Grippo. I won't bore you with the details but the i can tell you that Megasquirt obeys the "DIY equals cheap" golden rule. You'll pay only a fraction of any other branded aftermarket standalone ECUs not unlike AEM, Haltech, EMS, etc. But in my case, it won't be DIY by me. I am paying someone else to do it. I don't want to repeat the same mistake of neglecting the project due to business.

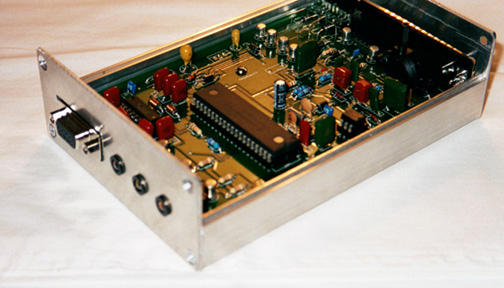
(image courtesy of Bowling and Grippo)

There were two options for me when i wanted to kick start the project again. First one is to get someone to wire the stock ECU and the second is of course Megasquirt. First option is much cheaper but then i thought why not shell-out extra money and future-proof The Dog. By future-proof i mean that if someday i want to upgrade the engine performance, Megasquirt is there to fine tune to my needs, be it N/A or Forced Induction upgrade.

The workshop where The Dog hibernated previously had no experience building Megasquirt so it was necessary for me to move it to some place else. If you're an Indonesian car lover and familiar with Megasquirt, surely you know where my destination was. I won't disclose the new workshop name yet until i can say that i am satisfied with their work.

Anyway, here's some pics of The Dog moving to the new workshop. Final payments were made to the old workshop and using their towing service, The Dog was moved.


The workshop seems unappealing to me at first but then i smack myself on the head and realized that this workshop belongs to a guy who has installed dozens of self-built Megasquirt himself. Not only that, the workshop is known by turbocharger freaks and the likes as usually this is where they go when they have forced-induction problem.

So there you go. The Dog project is rolling again now and hopefully progress will be much faster now that its in the hands of someone with better knowledge of injection systems.

Another thing i did for The Dog during my Christmas holiday is extractor hunt. As you know, i am still short of 4AGE RWD exhaust system for The Dog and with Megasquirt coming in soon, i will too need to get an exhaust system so that the engine can be started.

There were three options for me. First, the new workshop can built me a full exhaust system themselves. However, they're charging me premium for it since they're using full stainless steel pipes. These pipes will last forever hence the premium price behind them. Second option would be just to get me a set of extractors first. That way i can get the engine running, albeit with loud noise, and move the car to a cheaper exhaust system workshop. Third option would be to hire a towing service (again), move it to the exhaust workshop, tow it again and put it back to the Megasquire workshop. Doesn't sound to efficient for me.

I saw an ad for used RWD-mounted 4AGE extractors a few months ago but didn't get the chance to see the stuff myself. Luckily, the item was still available when i asked the seller a few days ago and it's cheap! However, it's built for KE70 so i can't be 100% sure if it'll fit my Charmant. My biggest worry would be from firewall and starter motor clearance. But since it's very cheap, i decided to buy it anyway. Here it is.
It turned out that the KE70's 4AGE had a similar transmission as mine which is the T50 coming from a Charmant. What this means is that the starter motor is placed on the same position. One less thing to worry about. Now as for the firewall clearance, i have yet to find out as i didn't get the chance to deliver the extractors to the new workshop. Dad will have to help me get it there. Crossing my finger here.

Anyway, i have decided that if the extractors don't fit, i'll pay the premium and let the workshop built me a custom stainless steel exhaust system.

So there you go.. The project's now running again with a slight change of direction but it's nearing the end nevertheless. Wish me luck!

Wednesday, November 10, 2010

Best Charmant Drift Video.. So Far

Just found this on Youtube today. Best Charmant drift video i've known so far.


Wow, i haven't written for too long that i barely remember how to embed videos.

Wednesday, May 19, 2010

Now, If You'll Excuse Me..

I have a work-related project coming up and it will keep me preoccupied for quite a while. In the meantime, i'll have less time to focus on The Dog.. sigh.. Oh well, work's an inseparable part of growing up for most of us, including me. I guess have to do what i am paid to do. After all, this is what pays for The Dog all along.

During the project, i will most probably write less often though i'll try to stay in touch. It's the early phase of the project that is going to keep me from The Dog and that phase has already started. For how long? I can't really say but the target is to close the project before this year's Eid holidays which is around September.

What's the latest status of The Dog? Well, last time the dashboard was taken down to ease me working of the harness. I've asked the workshop to reinstall the dash and to finish all the cooling and fuel lines. When those are finished, with headers borrowed from the workshop, we'll plug in the ECU and see if my harness works!

Once i get The Dog running, i'll send The Dog to an exhaust workshop for a complete re-do of the exhaust system. After that, it's time to put all the stuff i bought so far like the LSD, Corona axle, Prothane bushings, Bride seat etc. It'll be fun seeing all those stuff coming in at almost the same time!

Major stuff left for me to buy are the remaining suspension parts and brake upgrades. I've decided on the suspension part that i'll go with short stroke conversion. As for the brake upgrade, i am seriously considering going with 4 pot RX7 FC caliper conversion like many AE86 owners did on their car. This is the brake conversion i mean. I am still researching on brake upgrades so this is not final. Let's see what the internet brings to me later..

So.. if you'll excuse me, i have a project to do. But let me assure you that this will not the last time you'll see me.. Stay tuned!

Friday, April 30, 2010

Cusco LSD and Bride Pros Seat

My Cusco LSD has finally been delivered.. Glad to see that i got what i ordered: part number 130 L2. Now let's hope that it fits my Corona T130 axle.


Installing the LSD will have to wait until my engine starts. Will need to do more research on LSD oils, but most probably i'll go for Motul 90PA LSD Oil. I heard they perform well and help reduce LSD noise.

Meanwhile, just acquired my driver's seat today! Seeing that red Bride seats match my black Charmant on my photoshop wallpaper, i decided to get those. Recently, a used Bride Pros seat was for sale. I waited until the seller finally uploaded the pics and when i saw that it was red, i hurried made an appointment to see the item. Dad helped me check the item in Jakarta and with one quick glance, the seat was mine. One minor defect on the back but overall, the seat was in excellent condition.
Looks like someone beat me on the race to drifting.. Cute hat mom..
More pictures of the seat below.


Keeping my eye out for the passenger's seat. My target would be similar colored Bride seat, only this time will be recline-able. Red Bride Ergo II replica looks good and budget-friendly. Let's see if i can find green Takata safety harness to match.

DCC Has Got You Covered (in a Tabloid)

We're on the news! One of our automotive tabloid, OTOMOTIF, dedicated a small column for Daihatsu Charmant Community's 4th Anniversary. Here's the column scan..
The translation, more or less:
On Sunday (25/4), Daihatsu Charmant Community celebrated its 4th anniversary.
Themed as "Uniting with Nature and Animals", the celebration took place in an
open space, at Ragunan Zoo to be exact. The participants were from Jakarta, Bogor
and Bandung. Conforming DCC's slogan, "Saving The Breed", an award ceremony
and certificate giveaways were held to honor the members who were dedicated
to keeping Charmants alive. If you're interested to join, head to
http://groups.yahoo.com/group/daihatsu_charmant_community.

Sunday, April 25, 2010

Update 25 April 2010 - Fuel and Cooling

Here are some MMS sent by my workshop earlier last week. The thermostat housing has finally found its resting place, on top of the engine brackets. The water pump pipe has to be extended to reach the thermostat housing's outlet.
The fuel pump and filter also have found their home in the rear trunk. I noticed yesterday when i visited the Dog that the fuel pump and filter are in the wrong order. The way they are placed below, the fuel pump comes before the filter while i want it the other way around.
Last update from the MMS is my instrument panel. They made it using aluminum but it still has to be cut to fit the dashboard space.
Meanwhile, i acquired a used air filter intake pipe. It was meant for Honda D16 engine but seeing the way the pipe goes, i am sure it can be fixed to fit my 4A-GE. The best thing is that it has provisions for the engine ventilation hose and air intake temp sensor. The straight long section will have to be cut.

Last engine swap update is the wire mess that i still need to clean up. Nothing that cable spiral tubes can't fix.

Meanwhile, meet the first member of my suspension upgrade components. Used but uncut RS*R AE86 rear springs rated at 4.5 kg/m. Payments for them have been made and now they're on their way from Japan.

Hi! I am DCC-017!

Our Daihatsu Charmant Community celebrated its 4th anniversary last weekend. We made a gathering at Ragunan Zoo on April 25th 2010. It was also about time for me to check the progress on The Dog and so i decided to go back to Jakarta Friday evening. I arrived in Jakarta Saturday morning.

I visited the workshop on Saturday and continued working on the harness a bit. The harness is done but i still need to make some adjustment to the length so it fits. Will share some update photos after this. As usual, not to happy with the progress the workshop had made but since i have established that the workshop sucks, no need for me to further stress it out.

Anyway, Saturday went away quick and it was already Sunday morning. I did some chores first and took off to attend DCC's 4th Anniversary celebration just after lunch time. No surprise, reaching the spot at 2 PM, i was the last member to arrive since the gathering started in the morning.

Here are some shots of the gathering i took with my iPhone.


More photos can be found on DCC's Facebook page. Search for Daihatsu Charmant Community.

It was a fun day. We had lunch, discussed about our Charmants, took many photos etc. There was some kind of award giveaways for members with special achievements during 2009 like Charmant of the Year, Most Contributory Member, Most Visits to The Junkyard etc. Look what i won!
Roughly explained, i won the category for Most Technical member. I guess i talked about technical stuff too often. lol. Can't help it. It's in my engineer's blood.

We also drew lots to decide the member's ID number. Number 1 and 2 already went to Chairman Wanto and Vice-chairman Wahyu so starting from 3 and up, the ID number was randomly given. I got number 17.. So that makes me DCC-017!

Two Charmants caught my attention: Budi's with carburetted 4A-GE 16v and Sigit's running 4A-GE 20v. Here's Sigit's engine bay.
Sigit regularly attends drag races with his Charmant. At first it made into the 15 seconds 402 m class but a problem with leaking compression threw it off to the 16s class. Hope you can fix that leak soon Git! Forgot to take pictures of his interior but it was typical dragster: single bucket seat, roll cage, fire extinguisher and some funky switches. Since he got the 20v from a halfcut, he also installed the AE111 dashboard, trimmed to fit Charmant's width.

Below here is Budi's. It's also a dragster slash daily driver just like Sigit's.
Here's an interesting view.
Notice something missing? Charmant's T50 gearbox has its clutch slave cylinder on this side and it posed a minor problem when converting to a 4A-GE as the extractor pipes have to run very close to said cylinder. Budhi's Charmant, however, had its T50 swapped with another T50 but the replacement came out of an AE86 GTS. Hence, the bellhousing has the clutch cylinder on the other side. Good decision there.

All in all, it was a fun day with 17 Charmants showing up. Sadly my Charmant still can't join the pack.. God knows when will the day for me to drive The Dog arrives.

Friday, April 23, 2010

Tentative Plan for Suspension Upgrade

Finally made an initial plan for my suspension upgrade. This plan is still tentative but i don't foresee how i would deviate much from it, unless stuff are unobtainable. Very open to suggestion. If you find anything seem out of place below, shout on the comments.

As my plan for The Dog is mainly a daily ride with the ability to support some aggressive driving, i don't see any need for coilovers. I am not saying coilovers aren't great for daily but they would be overkill for The Dog. By coilovers i mean stuff like Greddy Type-S, D2 Racing, Ksport Kontrol-Pro etc. Detailed explanation on why i chose this setup will be done on coming posts. Not really an expert on suspension geometry and stuff but i believe i've enough research to support my decision on below setup.

FRONT
Basically i'll go for short stroke conversion with RCA. Relatively medium rate springs for stiffer ride while retaining kidneys intact.
1. Weld-on Ground Control AE86 Coilover kit rated at 6 kg/mm
2. Stock strut case shortened 40 mm
3. AE92 Koni Sport adjustable strut inserts, custom bottom spacers will be necessary
4. 35-40 mm RCA to fix the altered geomety from lowered ride height
5. Camber Plates & Swivel Hats
6. Custom strut brace, unless i can get cheap used ones

REAR
Strictly no coilovers here for me! Uncomfortable with putting load on the damper mounts despite of some people say they're strong enough. Thus, divorced system with springs rated at slightly above the theoretical 66% Rear to Front ratio to ensure no understeer.
1. 4.5 kg/mm rear linear AE86 lowering springs
2. Undecided rear dampers. Perhaps i'll go for Cressida dampers
3. Custom-made traction brackets
4. Custom-made adjustable trailing links and panhard rods, only if deemed necessary

I still have Prothane bushing kit eager to be installed. AE86 enthusiasts should be familiar with above setup. If you don't know already, Charmants and AE86s share similar suspension system. What do you guys think? If i do all the above points and include shipping costs, i would pay as much as, if not more than, said Taiwanese coilovers. Why bother DIY? Again, to learn something in the process and be sure that my system is cheaper in the long run. Cheaper? Yeah.. Try getting Greddy Type-S and finding out that they're not rebuild-able, let alone replacing the dampers when stuffed.

My biggest concern is that i still don't have a rear sway bar. My Corona axle and Charmant don't come with the brackets for one. I hope our local shops have a solution for me.

Wednesday, April 21, 2010

Take Off Your Pants

Yeah.. do that before you continue reading. You'll cream in them if you don't. All of you Charmant lovers with plenty of internet access like me know how difficult it is to find good videos of the Charmant. The best I know so far was a 20 second shot of Ryoji Takada drifting. Well that's about to change..

Meet Edward Corbin. He's a rally driver in the land of Barbados and uses Charmant as his machine and this is a 10 minutes video of him on gravels and tarmacs. 10 minutes?! Charmant?! Video?! Of?! lol.. Told you it's cream-inducing potential..


The video has been uploaded since Dec 2009 so it's obvious that i've been using the wrong search keyword. How did i found this video? All thanks to Gabe Tyler of technotoytuning or T3. I sent an email to him just today asking AE86 suspension bits and explained that i own a Charmant. It was a short wait before a reply came and he gave me a link to this video. It turns out that Edward Corbin is using T3 bits in his Charmant. Well, no need to argue T3 bits' strength and qualities now.. If they manage to survive Edward's level of punishment, i am sure they'll withstand my driving skills.

In other news, i am close to deciding how to upgrade my suspension. Will write about this soon.

Sunday, April 18, 2010

Calling Out All Charmants!

Fancy to see your beloved Charmant featured here? Now you can! Well i have been featuring other Charmants since i started this blog but let's make it official, shall we? I love Charmants and i know you do too. Let us spread the love! Let others see how charming Charmants are.. Send me photos of your Charmant along with some stories and specs to edgaraja@yahoo.com and you could see your beloved ride featured here for others to enjoy! From rusty to race-y, all Charmants are welcomed..

Monday, April 12, 2010

Overhauled Corona Axle and Some Bits

Not much of an update but here you go. Here's the finished Corona Axle, overhauled and repainted. Mom and Dad helped me with the repaint. They used some FlintCoat after scrapping the old paint with wire brush and sandpaper. Job well done! Thanks guys..


Just got my Ebay order of igniter plug delivered. My old igniter plug had lost the plastic housing, only the metal lug inserts are left, not a good friend of vibration and movement so i decided to get a new plug.
Last bit to update. My new thermostat housing didn't come with a good thermoswitch for the radiator fan so i bought a new one. Referring to my AE92 parts catalog, the Toyota part number for the thermoswitch is 89428-20060. Being an OEM replacement part, the list price for said thermoswitch is not cheap. However, the seller offered a substitute. He had a part substitution reference book and offered me this instead.
That's the same part as the OEM replacement only without the heftier Toyota price tag. I am still looking for the matching plug for it. Any idea where i can get it? Ebay isn't helping so far.