Friday, April 30, 2010

Cusco LSD and Bride Pros Seat

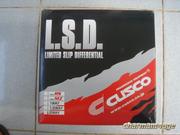
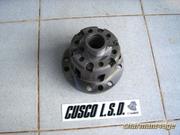
My Cusco LSD has finally been delivered.. Glad to see that i got what i ordered: part number 130 L2. Now let's hope that it fits my Corona T130 axle.


Installing the LSD will have to wait until my engine starts. Will need to do more research on LSD oils, but most probably i'll go for Motul 90PA LSD Oil. I heard they perform well and help reduce LSD noise.

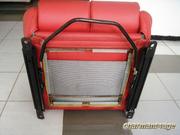
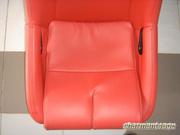
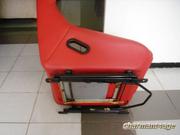
Meanwhile, just acquired my driver's seat today! Seeing that red Bride seats match my black Charmant on my photoshop wallpaper, i decided to get those. Recently, a used Bride Pros seat was for sale. I waited until the seller finally uploaded the pics and when i saw that it was red, i hurried made an appointment to see the item. Dad helped me check the item in Jakarta and with one quick glance, the seat was mine. One minor defect on the back but overall, the seat was in excellent condition.
Looks like someone beat me on the race to drifting.. Cute hat mom..
More pictures of the seat below.


Keeping my eye out for the passenger's seat. My target would be similar colored Bride seat, only this time will be recline-able. Red Bride Ergo II replica looks good and budget-friendly. Let's see if i can find green Takata safety harness to match.

DCC Has Got You Covered (in a Tabloid)

We're on the news! One of our automotive tabloid, OTOMOTIF, dedicated a small column for Daihatsu Charmant Community's 4th Anniversary. Here's the column scan..
The translation, more or less:
On Sunday (25/4), Daihatsu Charmant Community celebrated its 4th anniversary.
Themed as "Uniting with Nature and Animals", the celebration took place in an
open space, at Ragunan Zoo to be exact. The participants were from Jakarta, Bogor
and Bandung. Conforming DCC's slogan, "Saving The Breed", an award ceremony
and certificate giveaways were held to honor the members who were dedicated
to keeping Charmants alive. If you're interested to join, head to
http://groups.yahoo.com/group/daihatsu_charmant_community.

Sunday, April 25, 2010

Update 25 April 2010 - Fuel and Cooling

Here are some MMS sent by my workshop earlier last week. The thermostat housing has finally found its resting place, on top of the engine brackets. The water pump pipe has to be extended to reach the thermostat housing's outlet.
The fuel pump and filter also have found their home in the rear trunk. I noticed yesterday when i visited the Dog that the fuel pump and filter are in the wrong order. The way they are placed below, the fuel pump comes before the filter while i want it the other way around.
Last update from the MMS is my instrument panel. They made it using aluminum but it still has to be cut to fit the dashboard space.
Meanwhile, i acquired a used air filter intake pipe. It was meant for Honda D16 engine but seeing the way the pipe goes, i am sure it can be fixed to fit my 4A-GE. The best thing is that it has provisions for the engine ventilation hose and air intake temp sensor. The straight long section will have to be cut.

Last engine swap update is the wire mess that i still need to clean up. Nothing that cable spiral tubes can't fix.

Meanwhile, meet the first member of my suspension upgrade components. Used but uncut RS*R AE86 rear springs rated at 4.5 kg/m. Payments for them have been made and now they're on their way from Japan.

Hi! I am DCC-017!

Our Daihatsu Charmant Community celebrated its 4th anniversary last weekend. We made a gathering at Ragunan Zoo on April 25th 2010. It was also about time for me to check the progress on The Dog and so i decided to go back to Jakarta Friday evening. I arrived in Jakarta Saturday morning.

I visited the workshop on Saturday and continued working on the harness a bit. The harness is done but i still need to make some adjustment to the length so it fits. Will share some update photos after this. As usual, not to happy with the progress the workshop had made but since i have established that the workshop sucks, no need for me to further stress it out.

Anyway, Saturday went away quick and it was already Sunday morning. I did some chores first and took off to attend DCC's 4th Anniversary celebration just after lunch time. No surprise, reaching the spot at 2 PM, i was the last member to arrive since the gathering started in the morning.

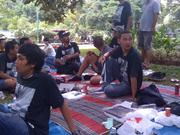
Here are some shots of the gathering i took with my iPhone.


More photos can be found on DCC's Facebook page. Search for Daihatsu Charmant Community.

It was a fun day. We had lunch, discussed about our Charmants, took many photos etc. There was some kind of award giveaways for members with special achievements during 2009 like Charmant of the Year, Most Contributory Member, Most Visits to The Junkyard etc. Look what i won!
Roughly explained, i won the category for Most Technical member. I guess i talked about technical stuff too often. lol. Can't help it. It's in my engineer's blood.

We also drew lots to decide the member's ID number. Number 1 and 2 already went to Chairman Wanto and Vice-chairman Wahyu so starting from 3 and up, the ID number was randomly given. I got number 17.. So that makes me DCC-017!

Two Charmants caught my attention: Budi's with carburetted 4A-GE 16v and Sigit's running 4A-GE 20v. Here's Sigit's engine bay.
Sigit regularly attends drag races with his Charmant. At first it made into the 15 seconds 402 m class but a problem with leaking compression threw it off to the 16s class. Hope you can fix that leak soon Git! Forgot to take pictures of his interior but it was typical dragster: single bucket seat, roll cage, fire extinguisher and some funky switches. Since he got the 20v from a halfcut, he also installed the AE111 dashboard, trimmed to fit Charmant's width.

Below here is Budi's. It's also a dragster slash daily driver just like Sigit's.
Here's an interesting view.
Notice something missing? Charmant's T50 gearbox has its clutch slave cylinder on this side and it posed a minor problem when converting to a 4A-GE as the extractor pipes have to run very close to said cylinder. Budhi's Charmant, however, had its T50 swapped with another T50 but the replacement came out of an AE86 GTS. Hence, the bellhousing has the clutch cylinder on the other side. Good decision there.

All in all, it was a fun day with 17 Charmants showing up. Sadly my Charmant still can't join the pack.. God knows when will the day for me to drive The Dog arrives.

Friday, April 23, 2010

Tentative Plan for Suspension Upgrade

Finally made an initial plan for my suspension upgrade. This plan is still tentative but i don't foresee how i would deviate much from it, unless stuff are unobtainable. Very open to suggestion. If you find anything seem out of place below, shout on the comments.

As my plan for The Dog is mainly a daily ride with the ability to support some aggressive driving, i don't see any need for coilovers. I am not saying coilovers aren't great for daily but they would be overkill for The Dog. By coilovers i mean stuff like Greddy Type-S, D2 Racing, Ksport Kontrol-Pro etc. Detailed explanation on why i chose this setup will be done on coming posts. Not really an expert on suspension geometry and stuff but i believe i've enough research to support my decision on below setup.

FRONT
Basically i'll go for short stroke conversion with RCA. Relatively medium rate springs for stiffer ride while retaining kidneys intact.
1. Weld-on Ground Control AE86 Coilover kit rated at 6 kg/mm
2. Stock strut case shortened 40 mm
3. AE92 Koni Sport adjustable strut inserts, custom bottom spacers will be necessary
4. 35-40 mm RCA to fix the altered geomety from lowered ride height
5. Camber Plates & Swivel Hats
6. Custom strut brace, unless i can get cheap used ones

REAR
Strictly no coilovers here for me! Uncomfortable with putting load on the damper mounts despite of some people say they're strong enough. Thus, divorced system with springs rated at slightly above the theoretical 66% Rear to Front ratio to ensure no understeer.
1. 4.5 kg/mm rear linear AE86 lowering springs
2. Undecided rear dampers. Perhaps i'll go for Cressida dampers
3. Custom-made traction brackets
4. Custom-made adjustable trailing links and panhard rods, only if deemed necessary

I still have Prothane bushing kit eager to be installed. AE86 enthusiasts should be familiar with above setup. If you don't know already, Charmants and AE86s share similar suspension system. What do you guys think? If i do all the above points and include shipping costs, i would pay as much as, if not more than, said Taiwanese coilovers. Why bother DIY? Again, to learn something in the process and be sure that my system is cheaper in the long run. Cheaper? Yeah.. Try getting Greddy Type-S and finding out that they're not rebuild-able, let alone replacing the dampers when stuffed.

My biggest concern is that i still don't have a rear sway bar. My Corona axle and Charmant don't come with the brackets for one. I hope our local shops have a solution for me.

Wednesday, April 21, 2010

Take Off Your Pants

Yeah.. do that before you continue reading. You'll cream in them if you don't. All of you Charmant lovers with plenty of internet access like me know how difficult it is to find good videos of the Charmant. The best I know so far was a 20 second shot of Ryoji Takada drifting. Well that's about to change..

Meet Edward Corbin. He's a rally driver in the land of Barbados and uses Charmant as his machine and this is a 10 minutes video of him on gravels and tarmacs. 10 minutes?! Charmant?! Video?! Of?! lol.. Told you it's cream-inducing potential..


The video has been uploaded since Dec 2009 so it's obvious that i've been using the wrong search keyword. How did i found this video? All thanks to Gabe Tyler of technotoytuning or T3. I sent an email to him just today asking AE86 suspension bits and explained that i own a Charmant. It was a short wait before a reply came and he gave me a link to this video. It turns out that Edward Corbin is using T3 bits in his Charmant. Well, no need to argue T3 bits' strength and qualities now.. If they manage to survive Edward's level of punishment, i am sure they'll withstand my driving skills.

In other news, i am close to deciding how to upgrade my suspension. Will write about this soon.

Sunday, April 18, 2010

Calling Out All Charmants!

Fancy to see your beloved Charmant featured here? Now you can! Well i have been featuring other Charmants since i started this blog but let's make it official, shall we? I love Charmants and i know you do too. Let us spread the love! Let others see how charming Charmants are.. Send me photos of your Charmant along with some stories and specs to edgaraja@yahoo.com and you could see your beloved ride featured here for others to enjoy! From rusty to race-y, all Charmants are welcomed..

Monday, April 12, 2010

Overhauled Corona Axle and Some Bits

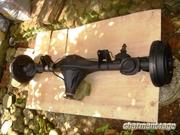
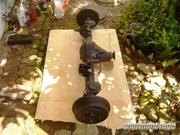
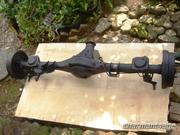
Not much of an update but here you go. Here's the finished Corona Axle, overhauled and repainted. Mom and Dad helped me with the repaint. They used some FlintCoat after scrapping the old paint with wire brush and sandpaper. Job well done! Thanks guys..


Just got my Ebay order of igniter plug delivered. My old igniter plug had lost the plastic housing, only the metal lug inserts are left, not a good friend of vibration and movement so i decided to get a new plug.
Last bit to update. My new thermostat housing didn't come with a good thermoswitch for the radiator fan so i bought a new one. Referring to my AE92 parts catalog, the Toyota part number for the thermoswitch is 89428-20060. Being an OEM replacement part, the list price for said thermoswitch is not cheap. However, the seller offered a substitute. He had a part substitution reference book and offered me this instead.
That's the same part as the OEM replacement only without the heftier Toyota price tag. I am still looking for the matching plug for it. Any idea where i can get it? Ebay isn't helping so far.

DIY Converting to Internally Regulated Alternator

My 4A-GE comes with an internally-regulated alternator, IR alternator from now on. Having very few chances to see my Charmant, i thought it still has the stock alternator which is externally-regulated (ER) by a electromechanical cut-out regulator (the black box near your battery). Hence, i was prepared to convert my charging system to suit the engine's alternator.

Here's a picture of the cut-out regulator and engine bay fuse box. You'll fiddle with these two stuff on doing this conversion.
Fortunately for me, i found out that the previous owned had replaced the alternator with an IR type so i was spared from having to figure out the charging system wiring. All there was left for me to do is extend the wires going to the alternator as it is now on the driver's side.

I won't discuss in detail about the ER alternator as i also have very few references about it. I don't even own a Charmant wiring diagram. (yes.. i would be in deep trouble if i actually had to convert from ER to IR). I will just jump to the IR system and tell you which wire to tap from the old system.

Here's an IR alternator charging system. Below is a Toyota charging system so i'll assume all IR alternators meant for Toyota models are using the same system.
As can be seen from above pic, there are four pins that you need to figure out from your alternator: B, IG, S and L, respectively stand for Battery, Ignition, Sense and Lamp. Consecutively, you need to figure out which cable from your Charmant's stock system to be connected to these pins.

First, here's my alternator pinout. If you have the same alternator, lucky you. If not, google is your friend.
Many people mistakenly assume that the large B lug on the alternator as the ground for the alternator and end up with a very expensive bonfire in their garage or at least, a glowing "ground" cable. Don't make the same mistake. B is in fact the alternator's charge output and should be connected to the battery. The ground is on the alternator body only so you won't need a dedicated ground cable for it. Just make sure you have a good ground loop on the engine block.

With the alternator side done, all that is left to do is figure out which wires on your Charmant to tap and connect to the alternator.

First, B should be connected to the battery. Your old alternator should have the B wire already. It's the thick wire approximately the diameter of your pinky.

IG can be tapped from from the ignition coil. It's the wire which connects to the (+) of the ignition coil. There maybe neater way to tap the ignition signal but this was how i found it on my car.

The rest, L and S are taken from the fuse box. Here are the wires that you need to tap.
There you have it. Four wires to tap on your Charmant stock system and four pins to connect on your alternator. Connect these pairs together and you should be done. I admit there must be neater way to have this done. I am quite sure that S, IG and L can also be found on the cut-out regulator's connector. If they do, it's better to tap the wires there as they would be kept close together and easier to troubleshoot.

Excuse me for not actually showing you the conversion work. I am merely showing you how it was done on my Charmant which was working properly the last time it is running. I will take no liability if you anything goes wrong. Blame the guy who did the conversion on my car.

Thursday, April 8, 2010

Cusco LSD Ordered

Finally made up my mind and went to pay the down-payment for a brand spankin' new Cusco LSD. With the Corona axle i just got, the only thing left is to get LSD. I hesitated a bit considering that LSDs aren't cheap but for the sake of having something to tell my children about (lol), i finally made the move.

The order was made yesterday and expected to arrive within 3-4 weeks. As my Corona axle is the same axle as Zenki AE86 (it better be, paying more for it than i paid for The Dog), i ordered the LSD for said model. Cusco have two types of LSD, RS-type and MZ-type. Basically what differentiates between the two is how the initial torque to activate the LSD is created. RS-type uses springs while MZ-type uses cone plates to create the initial torque. Here's a comparison pic between the two taken from Cusco's website.
RS is said better suited for street while MS is for track. The RS is always engaged slightly due to the springs and provides a smooth transition from partially locked to fully locked and is much more predictible and controllable due to this fact. The MZ is torque engagement only and is noisier/less predictible. As it doesn't engage until you're on or off the throttle to engage the plates.

All of those words above are just theories for me until i get the actual item on my Charmant. Which one did i get? I took the RS-type simply because it's said to be less noisy, smoother and the clutches last longer.

Next, 1-way, 1.5-way or 2-way LSD? 1-way LSD locks only during acceleration, 1.5 fully locks on accel and slight locks on decel while 2-way fully locks both on accel and decel. There are four part numbers for RS-type Zenki AE86 LSD and they are:
- LSD 130 F
- LSD 130 F2
- LSD 130 L15
- LSD 130 L2
Just so you know, the part numbers for Kouki AE86 start with 131 instead of 130. Cusco LSD can be changed between two of the three "ways" options during overhaul and the four part numbers above tells you which combination of "ways" are possible. F is 1-way or 2-way and initially built as 1-way. F2 is like F only initially built as 2-way. L15 is 1.5 and 2-way and comes initially as 1.5 way and the last one, the one that i bought, is like 1.5-way and 2-way and initially built as 2-way. Nobody wants 1-way and 1.5 combination, i guess. I could be wrong about this as i derived this info myself from here. Somebody correct me if i am wrong. My reason for choosing 130 L2? None. I have no experience at all with LSD but i think i won't need 1-way. So it's either 1.5 way or 2-way for me and guessing that 2-way will be more predictable that 1.5-way made me choose L2 over L15.

Let's hope everything turns out well!

Monday, April 5, 2010

Update 3 April 2010, Too Slow Guys..

This is what happens when you can't monitor your workshop frequently.. The progress will be irritatingly slow and they'll tell you tons of reasons that doesn't make any sense. Don't get me wrong, i am sure my engine swap workshop know their stuff but with all the work orders flowing in, infrequently monitored cars will be set aside and they'll focus on progressing others. Looks like i won't open up the name of my workshop then.. I wouldn't want others to experience the same thing. They won't need the extra publicity anyways. Most people have already heard of them. Anyway, here's the update.

Look at the custom gas cable bracket. That's all the progress they've achieved since my last visit to Jakarta on Feb 28th. Talking about stupid slow. There aren't many left to do but pending work will always be pending if they never get to it.
What did i do when i was in Jakarta? I finished the alternator wiring. Found something interesting when i did the wiring. It turned out that my Charmant has got an alternator upgrade when i bought it. Stock Charmant alternators are externally regulated while the one on mine has been upgraded to internal regulator. This is good news because my 4A-GE comes with similar alternator. What's left for me to do is extend the plug wires because now 4A-GE alternator is placed on driver's side while 4A-C has it on passenger's side. I'll write about how to convert to internal regulator alternator on Charmants after this.

Finished the alternator wiring, I went to a second-hand parts seller and got this.
Can't tell you how excited i was when i got it. That's a remote thermostat housing for 4A-GE and stuff like that are scarce here. I would need to order a new one if i want it as i am sure no shop would want to stock such slow moving part. I didn't think that i would ever get my hands on used one before and was ready to get my engine running without thermostat. You need thermostat to get the engine to the correct running temperature quickly. Without one, it would take longer time to, if ever, reach said temperature and engines in cold condition consume more fuel. Certainly this would help my mileage a lot.

I learned that the thermostat housing i got was not for AE92 4A-GE. Comparing it with the pic below (forgot where i found the pic), i learned that it was for AE82 4A-GE. If i am not mistaken, AE82 runs bigport 4A-GE while my engine is smallport. I can still use it since they're basically the same. Only the direction of some of the outlets are different.

I also bought some EFI fuel and radiator hoses and managed to salvage the fuel filter of a Mercedes Benz C180 W202. This fuel filter would match my Bosch fuel pump perfectly.

What's left to run the engine? As i said, not many. Fuel pump and fuel hose installation (which should take 2-3 hours max including fabricating the brackets), remote thermostat fitting (one day?), exhaust (one day?), tuning etc (one day?) and that's it i think. If my workshop actually work on my car, it would only take them less than a week to finish the car. We'll see how long it actually takes them.