Friday, February 25, 2011

T3 Parts and RX7 Calipers Delivered

Santa Claus disguised himself as a postman today and gave me early Christmas present..
Inside are these eye candies.
Also cousin back home from Australia emailed me these pic. He already has them at his home in Jakarta.
Looks like i'll be rolling lower and brake harder sooner than i thought!

Thursday, February 24, 2011

Daihatsu Saruman Tarbo

Got this delivered home last night.
A set of 4AGZE ceramic coated forged pistons w/ 20mm pins. These are for the 8.9 CR version and 0.50mm oversize to match my current bore diameter. Yes, I finally made the first move on turbo conversion.

I haven't bought the piston rings though. The seller quoted me triple the price of smallport rings and from what i gathered so far from my research, they're the same size. Size, not material, mind you. I don't know if there's any differences in material or even ring tension. Part numbers are different though. 13013-16200 for N/As and 13013-16210 for their F/I brethren. Close enough for me to think they're the same stuff, only incremented the numbers just to differentiate the application. If they're indeed the same, i'll be using my old rings as they're only less than 500km used now. Can anyone help me on this?

With this purchase, Pandora's box's been opened and all hell broke lose (from my bank account). Going turbo could easily cost me a quarter of the budget i've spent so far so i'll have to go at it slowly. Nearest purchase would be a set of DIY Wideband Lambda Controller to aid tuning the Megasquirt once everything is on and a set 0f 7M-GE injectors. Those injectors are high impedance and would seat themselves easily between the manifold and fuel rail.

I'll be checking a used A.R 48 T25 'tarbochage' soon and if confident that it should run smokeless, then it's one less stuff to get for the conversion.
My Saruman approves.

Thursday, February 17, 2011

Another Reason to Love Charmants: S13 Suspension Conversion

Just browsing through and found this interesting bit taken from Nissan Cefiro wiki page:


A31 Cefiros are scattered around here in Indonesia. I once saw one in a junkyard. How's this related to our Charmant? Well, some AE86 owners convert their front suspension to S13 for benefits i'll explain later. Having exact same suspension setup as AE86, this conversion also applies to Charmants.

Here's some discussions on S13 suspension conversion on AE86: here, here and here. Oh also here and here. Those links should be enough to tell you how popular this conversion is for AE86 owners.

It's too late for me as i have chosen to go with short stroke conversion but had i known this earlier, i'd seriously look into going for such conversion.

Here's some benefits on this conversion:
- Wider array of brake upgrade options (how about some R34 Brembos?)
- Stronger hub
- More steering lock for you drifters
- Wider track due to longer control arms
- Allows you to run high positive offset wheels aka FWD wheels --> just like my Oldskools.

Obligatory pic to make this post less boring taken from one of the links above.

Wednesday, February 16, 2011

RX7 Brake Upgrade and Short Stroke Conversion Goodies!

Exchanged a huge chunk of last month's salary with these goodies last weekend.
Let's see what we have here..

First, i got the 80 series Land Cruise Brake Master Cylinder i need for my RX7 brake upgrade. I got the Aisin one, not the expensive Toyota OEM. I paid half of the Toyota OEM part and, as far as i know, Aisin makes them for Toyota. So, same stuff for half the price.
In case you're wondering, part number for the Master Cylinder is 47201-60530. Make sure to match the brake booster bolt hole numbers to your vehicle. There are two types: four bolts or two bolts. Mine is two bolts. This stuff is major upgrade for AE86s or Charmants, having one inch (25.4mm) cylinder diameter compared to the puny 13/16 inch (20.64mm) of AE86's.

Having no brake pads on my Ebay RX7 brake calipers, i also bought the pads coming from also 80 series LC. I learned that these pads should fit my RX7 calipers easily. I sure hope i am right..
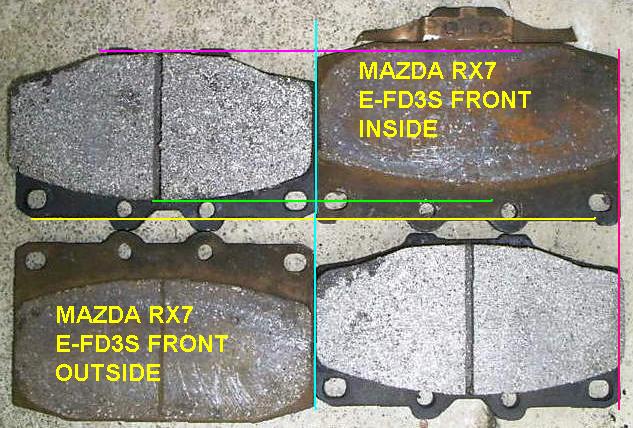
With the caliper positioned as pictured, the brake pads measured 119 x 51mm. I got the Bendix General CT type which is suitable for general purpose driving. 80 series LC here have VX Turbo decal on the body, hence they're commonly referred to as Turbo LC as marked on the Bendix pack. *** update March 2nd 2011, see below ***

Next comes the u-joints for the propeller shaft..

Then the front steering links, explained previously.
and finally, the most important stuff, the front and rear dampers for my short stroke conversion. I'll discuss in detail for these stuff. Here's the front strut inserts: Kayaba Excel-G part number 365068 originally for Toyota Corona T170 series.
Shown above is the Excel-G compared to the original strut insert. You can see how much difference in length between the two.

Below is for the rear ones.
Unlike the fronts, these are cheaper Kayaba Gas-A-Just part number 553041, i believe they're originally for A60 Celicas. You can also see the length comparison to the stock orange dampers. These Gas-A-Just shocks are very stiff. I had very difficult time compressing to the minimum length when i measure it.

These are the measurements i managed to get for these dampers. I hope this is useful for owners of Charmants, AE86s or any other similar vehicles.
Front stock strut inserts (Part # found on the strut body is 48511-22190):
- Extended Length (E.L) = 645mm
- Fully Compressed Length (F.C.L) = 450mm
- Body Length (B.L) = 400mm
- Total Travel = E.L - F.C.L = 195mm

Front short stroke Kayaba Excel-G Part #365068 strut inserts:
- E.L = 540mm
- F.C.L = 390mm
- B.L = 340mm
- Total Travel = 150mm

Stock rear dampers. Found these markings: Kayaba Super-1000 SN8212 DL13
- Extended Length = 605mm
- Fully Compressed Length = 390mm
- Total Travel = 215mm

Short stroke dampers. Kayaba Gas-A-Just Part # 553041.
- E.L = 530mm
- F.C.L = 367mm (approximately, difficult to keep it compressed and measure)
- Total Travel = 163mm

Lesser important stuff obtained last weekend are these..
Front strut bar were borrowed from my brother, Erick. It was for Lancer EVO4 originally and as you can see, a bit too long for my Charmant. Well, another customizing job to put on the list i guess.

*** update March 2nd 2011 ***
The pads turned out didn't fit. There are two versions of these pads. The turbo and non-turbo pads. For RX7 calipers, you need to get the non-turbo pads which are smaller. You have been warned.

Tuesday, February 15, 2011

T-series Axle Fitment and Steering Links Renewal

Took the chance last weekend to get the Corona RT132 rear axle fitted. This is a T-series axle similar to Zenki AE86's axle. With this axle, i can then install my 2-way Cusco LSD.
As expected, the fitment work itself basically is an easy bolt-on job. Only problem came from my own mistake of forgetting to get the lateral (panhard) bar that came with the axle. I was under the impression that the lateral bars are interchangeable between my S-series originally from The Dog and T-series from the Corona. I was wrong apparently. I had to hunt for the matching lateral bar at the junkyard and luckily i finally got one. Here's the comparison.
Lower one is from my Charmant with red Prothane bushings. There's approximately an inch difference in length.

If you're doing the same conversion, don't forget to also get the e-brake cables that are attached to the rear brake pads. They are a pair for left and right, each of different lengths and also completely different from that of Charmant's.

Along with the rear axles, the 24mm rear wheel spacers were also put in place. I was relieved to see that 24mm is enough to push the wheel lips just outside the fender. Yes it would be better with 30mm but 24mm is enough for me.
A slight miss-communication prevented me to take important measurements on the axles when both were removed. I can't confirm whether the wheel track width is the same between both axles. Also i can't confirm whether the 4-link bracket positions are the same. It's not too late, i can have it measured with the T-series installed, only it will be a bit more challenging. All i learned yesterday was everything bolted up easily.

How about the propeller shaft? Well, the original propeller shaft from The Dog can be bolted on easily although the third member from a T-series is obviously longer. I read that i have to shorten the propshaft by 20mm to get the perfect fitment. I'll get right to it as soon as i can especially i have also planned to lower the stance. That would push the prop-shaft further into the T50 gearbox and increase the risk of bottoming the yoke to the gearbox shaft.

Other than being able to fit an AE86 LSD, another advantage of getting a T-series axle is the significant increase in drum brake diameter as shown here. The smaller drum is Charmant's original.

That's for the rear-end. As for the front-end, i managed to replace all steering links with new ones. Some, if not all, of my links were still in good condition but i decided to replace them anyway. Here's the new stuff.
A pair of rack-ends and outer tie-rods. Not seen here are the rack rubber boots and lower control arm ball-joints. Everything except the boots are identical to KE70's. The beauty of Toyota-Daihatsu interchangeability. Installing new steering links would require wheel alignment but i decided to wait until i can get the short stroke struts in.
Along with those steering link parts, i also bought some important parts for my short stroke and RX7 brake conversion. I will share the parts i bought in another post.

By the way, I WANT THESE.. lol
They're called heim joints (or rose joints or spherical rod ends, depending where you're from). They're the essential part of fabricating my own rose-jointed adjustable 4 links and panhard rod. T3 sells them for a whopping US$360 just for the 4 links. Panhard cost about US$135. If i can get my hands on these, i'll save a lot. Yes, the Prothane bushings would then be useless but i can always sell them to KE70 users.

Wednesday, February 9, 2011

Traction Brackets DIY and Wheel Spacers

Having FWD offset, my Axis OG Oldskools wheels need some spacers for them to fit snugly on The Dog. I've already got the front spacers at 20mm thickness. Now i only need a pair of rear ones. My guess is that i need about 30-35mm spacers to get the outer rim lips sit just outside my fender.

I got an offer for two pairs of 25mm spacers yesterday. Hoping that my 30-35mm guess is wrong, i took the risk and bought the 25mm just today. Here they are..

I have 3 pairs of spacers now: a pair of 20mm and two pairs of 24mm. Who knows one day i'm crazy enough and put 44mm of stacked spacers?

Anyhow.. the seller just happens to be an owner of a machine shop. I was looking for a machine shop to make me RX7 caliper adapters and asked them whether they're up to the job. I showed them pics of how the adapters would be and, just like that, i can now make the adapters locally! Lucky me. Hmm.. business opportunity? How many of you still need these adapters really? One thing left to worry about then is the delivery of those Ebay calipers from Aussie.

Once installed, my rear RS*R springs should lower the car significantly and i learned that i will need traction brackets to avoid axle wrap. I won't talk about the reasons behind traction brackets just yet. I'll only talk about having the machine shop make me those traction brackets. Not really a DIY process, i know. It's more a DIT or Do It Together. LOL. The machinist did all the dirty work and i showed him the design and kept him on track mostly because he had no idea what exactly was he working on.

What's a traction bracket? Here's some samples, courtesy of grey_nomad of Toymods forum.
As shown above, traction brackets are attached to the rear lower control arm mounting brackets on the axle. The control arms then will mount to these traction brackets, returning the lower control arm angle to the original position on a lowered 4-link suspension vehicle similar to Charmants and AE86s.

Each traction brackets comprised of two side plates and one bridge plate. Side plates are the ones attached to the original mounting brackets while bridge plate are welded to the side plates and keeps them on a fixed width. Also i just made up those names myself.

Have you clicked that grey_nomad link above? If not, you were just about to lose a valuable information. Go ahead, click it and read the posts. The wonderful grey_nomad was kind enough to go through the hassle of drawing us the measurements of his traction brackets. Still haven't clicked the link? I'll save you from your laziness and present the measurements below.

Not really rocket science eh? Hole A and B will be bolted to the original brackets and no, you don't have to drill any holes on the original. Hole C and D are your two options for the new mounting positions. Notice how C and D are of slightly different heights? This is designed to retain your pinion angle.

This is how it goes using a 4mm steel plate..

This is the result.
I haven't welded the bridge plate just yet. I don't have the axle to get the actual width so i can't weld it yet. On workdays, i'm 200km away from The Dog, remember? grey_nomad did gave us the measurement on his drawings above which is 57.6mm but i'm playing safe.

I will also need a pair 3mm washers on the inner side where the control arms will be mounted. This is to maintain the original bracket width. Remember, you're bolting the side plates outside of the original brackets so the washers should be placed inside.

As part of my appreciation to the machine shop for letting me tour their work area and watch the whole process, i'd be happy to inform you their contact details. Though i doubt it would be useful for those of you in Jakarta, at least this gives you more alternative to great machine shops. This machine shop is called Radja Basa and located at Jalan Raya Hajimena No 168, Natar, Lampung Selatan. You can contact the owner Awie on +62-721-703-576. Here's their sign.

Monday, February 7, 2011

Commencing RX7 Brake Upgrade

Just got lucky. Won Ebay Australia auction for a pair of used RX7 FD brake calipers. These babies are essential for the well-known brake upgrade option for AE86 owners. Having 4-pots each, brake fades should be a thing in the past.


Although it's a good idea to rebuilt used calipers before use, i'm going to be cheap and just believe the description on Ebay: Recently had fluid in them and were being used, they will be OK for use without rebuild.

They come without pads so i'm on the hunt for new ones. Figuring that brake pads are somewhat fast-moving spare parts, i don't want to have to preorder everytime i need new ones. I went looking for an alternative available locally and budget-friendly. Obviously you don't see RX7s rolling in Indonesian streets a lot so you can't expect many shops would stock their brake pads. However, thanks to this wonderful Malaysian blog, i learned that 80 series Land Cruiser brake pads should fit with minor mods. Here's the comparison.


Curvy one is LC's. You can see the sides are a tad bigger but that should be an easy fix with a grinder if necessary.

Obviously i'm going to have to find some way to mount these RX7 calipers to my struts. I've been trying to contact AJPS for the last few days but no response so far. AJPS manufactures these equally essential parts..


These slick looking stuff allow me to mount that RX7 caliper on my stock strut, which is identical to AE86 strut. Kinda worried since AJPS haven't responded so far. Why the hurry? Well, i am counting on my cousin to bring me back these stuff from Aussie and he's flying back next week. AJPS is in Adelaide and he's in Sydney. It'll take some time to deliver these parts and that's what i don't have much of. I hope they're not out of stock.. Or, seeing on the bright side if they do, i might have similar bracket machined here for much less. However, this is not something the average machine shop here can make.. with same level of safety and quality anyway.

Anyway, as stated on their website, these adapters are to be matched with 262 x 20mm Honda Civic EG6/EK4 front rotors. Luck is again on my side.. Right in the middle of writing this post, i just made a deal for a set of used EK4 rotors and met with the seller in person. Measuring the dimensions using a ruler, all is perfect. How can i tell that the measurements are correct?

Meet DBA Rotors, taken from their website, Australia's leader in innovative blah blah blah and the production of performance disc brake rotors. The best part of their website is the online catalog where you can check the sizing of many OEM disc brakes. Using this service, i learned that these are the main measurements:


- Rotor Overall Diameter (A)
- Total Height (B)
- Disc Thickness (C)
- Minimum Disc Thickness (D, not shown)
- Center Bore Diameter (E)
- Number of bolts (F)
- PCD (G)

Just from logic, E to G are negligible as we can get them machined to our suit. A to C are the main numbers you need to watch. These are the values for EG6/EK4 rotors for A, B and C.
A = 262 mm
B = 45 mm
C = 21 mm
Thickness is only 1 mm off from AJPS's spec but diameter is perfect. Those values are also what i found on the discs that i bought just 15 minutes ago! They need to be machined to fit the Charmant hub but that's easy work.

Now, the remaining parts are the caliper brackets and brake pads. Brake pads are easy. Only thing left to worry about is the caliper delivery to Indonesia and caliper brackets. If AJPS do ran out of stock, hopefully i can get fabricate one here. Hoping everything will turn out as planned.

One thing i don't understand fully is whether the master cylinder is sufficient for those massive calipers. I've read some say the brake feel will become mushy but some also say it's fine. I can't really tell until i install them but i already got a plan ahead. If i end up having to replace the master cylinders, guess what will be an easy upgrade? Well, again 80 series Land Cruiser to the rescue! They have bigger inner diameter (one inch) which would be perfect for a pair of 4-pot front calipers and it should be a bolt-on work. How accurate is this info? Here's one proof. Head on to one of Bob R's monkeymagic86 blog post and you'll find this pic below.

Those are the stuff that went to Bob's beautiful AE86 (good stuff btw). He's using the same RX7 brake upgrade method. Check the lower-mid part of the pic. See a master cylinder? Bob mentioned that he's using a Land Cruiser master cylinder. Which version? Go to google image for Land Cruiser 80 Series Brake Master Cylinder and match the results with Bob's.

*** edit Feb 10th 2011 ***
Speedhunters just put a write up on Ryan Beal's 3S-GTE powered KE70. Ryan's car is equipped with Land Cruiser calipers and RX7 pads. This just proves even more that the brake pads are interchangeable. Here's the pic.

Thursday, February 3, 2011

Rolling on New Wheels

Axis OG Oldskool 15x8 114.3x4 ET+28 on The Dog. Tires are both 185/55/R15 front and rear. They're Achilles ATR Sport for those who care. Contemplated on 175/50 previously but soon changed my mind seeing how narrow and weird they would look on Charmant's wide body. Hence, semi-stretched look yet maintaining balance with body dimension.

A word of advice: avoid using the same wheel measurement for your Charmant. 15x8 inch and +28mm of offset will give you headache. On the front end, the inner wheel lip will touch the strut housing. You'll need 20mm of spacer to get enough clearance between them, which is what i did. With that thickness, you'll want hub-centric spacers. Avoid universal spacers which only give you vibration and added risk.
On the rear, there's no problem with fitting the wheels but you'll soon realize that they will be too deep inside the wheel wells. Null effect on performance but also zero points on looks. You'll need about 30mm of spacers to poke the wheels out a bit for that extra thumbs-ups.

Those of you familiar with wheel measurements should already know that such positive offset is usually for FWD cars. Based on this experience, with 15x8, i'd say the maximum offset is ET+0. The lesser, the better. You can calculate yourself if you have other wheel size. For example, with 15x9, you don't want to go more than ET-12.

Enough with me blabbering. Let's get down to business.. Pics!!!
78evmliprcfy7qiujg.jpg p8akjvxeua85t1mjiijb.jpg 3cfrcpp4ct2navut4gcp.jpg
d329vqs1z64stn5q1buk.jpg adxbouxnci98ob2trvhu.jpg hiuu3hxwtu8vyvzvfhe.jpg

wg2ygox8oqdpfbb188c.jpg kpw61khcvriez1dxr1c.jpg 8bs670dqzi4fm3hgygq.jpg

Now, with that done, are we getting closer to this guy?
Drool-worthy authentic Work Equip 03s.. Who knows when i can get my hands on them.

What The Dog desperately needs now is some lowering and that 30mm rear spacers. Lowering will have to wait for the T3 suspension parts to arrive and spacers, well, let's see if i can get lucky again just like on the front ones. Got the front spacers for sale just when i was confused on the inner lip-strut problem but i don't think i'll get so lucky this time and have to go the long way of having a machine shop make them for me.