Showing posts with label exterior. Show all posts
Thursday, January 31, 2013
Four Eyes
Here's something i'm sure you've contemplated while looking at your worn out headlamps and having trouble finding replacements. Jefry, a fellow Daihatsu Charmant Community member, finally did it. He adopted early E70 Corolla quad lamps on his Charmant. It's not exactly a neat job yet but at least you know it can be done.
Anyone done a better job? Send me the pics!
Sunday, October 7, 2012
Alive and Kickin'
Just because my focus is on my two-wheels project lately, doesn't mean i'm neglecting The Dog. Here's her new looks..
Front grille and rear license plate surround/garnish which i believe are from top-of-the-line Charmant Altair. I have very little idea about Altairs so i can't tell you more, unfortunately. I still need to remove those ugly license plate light on the bumper, cover the holes and install these lights below that came with the garnish but even now she looks much better, doesn't she?
These are for sale as they're no longer used, obviously.
Monday, January 9, 2012
Thursday, January 7, 2010
I Suck at Photoshop
I found this funny Photoshop tutorial when i was procrastinating as usual on Digg.com. It's a web video series called You Suck at Photoshop and its hosted by a cool dude named Donnie Hoyle. On the series, he's supposed to be a total loser who lost his wife to a guy named Ricky and ... well i won't spoil the fun for you. Just go ahead and look it up on Youtube. If you're learning Photoshop and don't mind being tutored by a foul-mouthed guy, You Suck at Photoshop will boost your skills in no time.
Anyway, i've finished watching all of the tutorials and decided to have some fun with the skills i just learned. I photoshopped some of The Dog's photos and here's some of the results. Don't laugh okay cause i know they're still very rough and amateurish but i think they're good enough for a guy who just learned how to use the heaven-sent application.
First, I have always been curious how my Axis Oldskool would look on The Dog. Well now i know and i also add a little extra of lowering to it.
and here's how my Globeline rims would look.
This photo was taken a few days ago when The Dog just finished its bodywork. I did some mods to it which you'll see later down.
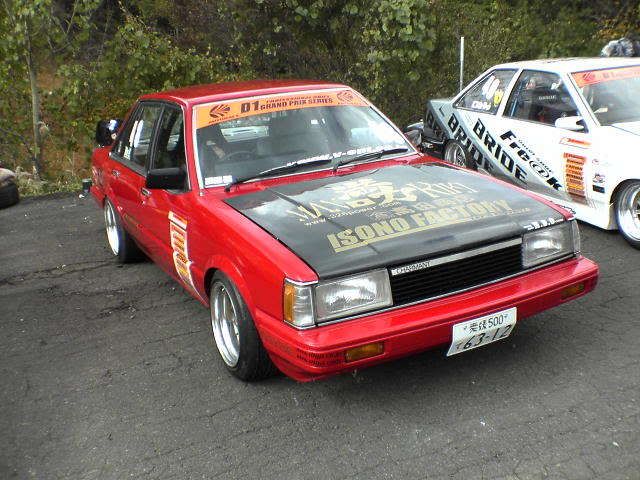
How about replacing the hood with carbon fibers?
Or since i am going to imitate Ryoji Takada's ride, how about applying some D1GP decals?
I still have a lot to learn obviously but with work slightly slowing down, i have some time on my hands and would love to spend it on sharpening up my PS skills. Do share in the comments if you have more links to good PS tutorial.
Anyway, i've finished watching all of the tutorials and decided to have some fun with the skills i just learned. I photoshopped some of The Dog's photos and here's some of the results. Don't laugh okay cause i know they're still very rough and amateurish but i think they're good enough for a guy who just learned how to use the heaven-sent application.
First, I have always been curious how my Axis Oldskool would look on The Dog. Well now i know and i also add a little extra of lowering to it.
Monday, January 4, 2010
Update 5 January 2010, Bodywork Done!
Finally.. after almost a year since i put the Dog in the body workshop on March 8th '09 (see, that's the advantage of having this blog, i can pinpoint the exact date of anything!) now it's finish on January 5th '10. These are the last shots of The Dog just before Erick, my big brother, helped me took it out of the workshop and drove it to our garage.

Click on photos below to enlarge.

Will be writing about the plans for the engine swap workshop soon just to make sure i don't forget anything.
Click on photos below to enlarge.
Will be writing about the plans for the engine swap workshop soon just to make sure i don't forget anything.
Update 4 January 2009, Last Bodywork Update Pics?
As said on the title, i hope this would be the last time i show you any progress for the bodywork. If all goes well, dad should be able to pick the car up from the workshop today and keep it at home while it waits for me to arrive in Jakarta this weekend to move it to the engine swap workshop.


Crossing my fingers!
Thursday, December 31, 2009
New Year Update: Engine's Up!
Yay! Finally i got my stock engine back up and running! I asked the workshop to reinstall my stock engine back as i am afraid that crucial stuff might be missing, stuff that i might have to reuse when converting to 4A-GE later. If the engine's running, at least i know all the important stuff are there. Besides, it's either pay a towing service to move the car to the engine workshop or pay the body workshop extra to put the engine in and be able to drive it myself there.. I am getting the said advantage by doing the latter.

Not much is left to do as far as the bodywork goes. I guess i have to get back to Jakarta again in a week or two once they finish to move The Dog to the engine swap workshop. If you need any Charmant stuff (or any car stuff actually), let me know and i'll see what i can do to get it for you in Jakarta.
Tuesday, December 29, 2009
Ghetto Wing Mirror Fix Up
My left-side wing mirror was in a very bad shape when i bought The Dog. The spring inside the housing had lost its anchoring tab so the mirror wouldn't stay in position. That and the mirror glass itself was broken. Perhaps the previous owner fell in love so much with The Dog and decided to test its strength by hitting a pole with the mirror.
When i was in Kumala Motor, i gave the mirror to the seller and asked if he has a new one. It took him a while to check his stock but finally he came up with this..

That is part number 87940-12500, a Toyota original wing mirror for KE70 or TE71 and i can assure you, it's NOT CHEAP. Those f*ckers in Kumala charged me 100 bucks for it. After i wiped my mouth from coughing blood from paying so much for a wing mirror, i took it to The Dog and you know what? It didn't fit! The triangular shape that attached to the door is a bit too large. Didn't i compare it first with my old mirror before i bought it? I did and have noticed that possible problem. That's why i made an agreement with Kumala to return the mirror if it doesn't fit. I sure am glad i did that!
So now i am back to square one after i returned the mirror and got a refund: a busted Charmant wing mirror on my hands. I need to get it fixed before i leave Jakarta for work again!
On my way to Kumala on Dec 26th 2009, i saw these ghetto kiosks of wing mirror sellers on Sawah Besar area. I thought perhaps these guys could help me fix it. So the next day i decided to try my luck, visit one of them and after some discussion and negotiation, I agreed to trade 6 dollars for their service. Yes, 6 dollars!
Basically there are two problems with my mirror: shattered mirror glass and broken anchoring tab for the spring. The broken glass was easy to fix. First they cut a new mirror to size.

and glue it in place..

That's a glue stick for glue guns, heated with a lighter and spread over the mounting plate like making a PB&J.
The second problem was a bit tricky.. The anchoring tab for the spring is broken so the mirror cover would flop around under movement. Here's my awful illustration of the spring.

When you're done laughing at my illustration, here's what they do to fix it.. First they take a motorcycle chain link and fold it to make an L-shape. The first hole is for bolting to the mirror housing and the second hole is for the anchoring tab.

Next they drilled a hole for the bolt to hold the new tab.

Finally, they bolt the chain link in place and there you go.. A new anchoring tab for the spring!

It took them around 2 hours to fix it. The hardest part was determining how to make the new anchoring hole and putting it all back together. Finally, i end up with this..

LOL, they've just saved me US$94 and all done from this crappy.. uuummm.. wonderful kiosk..

Now, let's hope the mirror stays intact before i can find a scrapped Charmant with better left wing mirror.
When i was in Kumala Motor, i gave the mirror to the seller and asked if he has a new one. It took him a while to check his stock but finally he came up with this..
That is part number 87940-12500, a Toyota original wing mirror for KE70 or TE71 and i can assure you, it's NOT CHEAP. Those f*ckers in Kumala charged me 100 bucks for it. After i wiped my mouth from coughing blood from paying so much for a wing mirror, i took it to The Dog and you know what? It didn't fit! The triangular shape that attached to the door is a bit too large. Didn't i compare it first with my old mirror before i bought it? I did and have noticed that possible problem. That's why i made an agreement with Kumala to return the mirror if it doesn't fit. I sure am glad i did that!
So now i am back to square one after i returned the mirror and got a refund: a busted Charmant wing mirror on my hands. I need to get it fixed before i leave Jakarta for work again!
On my way to Kumala on Dec 26th 2009, i saw these ghetto kiosks of wing mirror sellers on Sawah Besar area. I thought perhaps these guys could help me fix it. So the next day i decided to try my luck, visit one of them and after some discussion and negotiation, I agreed to trade 6 dollars for their service. Yes, 6 dollars!
Basically there are two problems with my mirror: shattered mirror glass and broken anchoring tab for the spring. The broken glass was easy to fix. First they cut a new mirror to size.
and glue it in place..
That's a glue stick for glue guns, heated with a lighter and spread over the mounting plate like making a PB&J.
The second problem was a bit tricky.. The anchoring tab for the spring is broken so the mirror cover would flop around under movement. Here's my awful illustration of the spring.
When you're done laughing at my illustration, here's what they do to fix it.. First they take a motorcycle chain link and fold it to make an L-shape. The first hole is for bolting to the mirror housing and the second hole is for the anchoring tab.
Next they drilled a hole for the bolt to hold the new tab.
Finally, they bolt the chain link in place and there you go.. A new anchoring tab for the spring!
It took them around 2 hours to fix it. The hardest part was determining how to make the new anchoring hole and putting it all back together. Finally, i end up with this..
LOL, they've just saved me US$94 and all done from this crappy.. uuummm.. wonderful kiosk..
Now, let's hope the mirror stays intact before i can find a scrapped Charmant with better left wing mirror.
Monday, December 28, 2009
Christmas Shopping: Ripped Off!
I went for some Christmas shopping for The Dog in Jakarta last week. Most of the stuff i bought were either for the body work or so that the mechanic can fit the stock engine back. I learned something interesting after the shopping.. There's a thing about having an old car, you may not be able to get all the parts you need from just one seller. You need to go to maybe 4-5 sellers before you complete your shopping list. When you do, make sure you get their name cards. You'll be grateful later. You'll avoid getting ripped off. This is about doing the basic thing before you spend your hard-earned cash on anything: price comparison.
Before last Christmas, i only knew one spare parts seller to supply my Charmant's needs which is Serimpi Motor. He was the seller that supplied me the head lamps, side lamps, etc. Since Charmants are so rare, i thought this seller was maybe like the one and only guy who sells Charmant parts. I was wrong.. I heard about another seller, Kumala Motor from a forum. This is a famous seller among retro car owners. Just like GI Joe, "When all else fails, he doesn't", Kumala Motor is the place to go when you've run out of places trying to get your hen's teeth part. So i decided to pay the seller a visit.. Kumala Motor is located in Krekot Jaya, quite a distance from home but for the sake of seeing in person this well-known seller, i went anyway.
Kumala is famous for selling very rare parts but also for the hefty price tag. Expect to see lineups of rare part hunters there too. After an hour drive, i finally get to see Kumala Motor. It didn't look like i what i had in mind. Maybe it was because i went there on Boxing Day, there weren't so many people shopping but the place was so small and cramped, you start to imagine how to fit many people inside on a busy day.

Just like Rosso and his bumblebee, one of my engine mounting rubbers was split in half and the other will also need replacing soon. Hence, a pair of engine mounting rubbers is on the shopping list. The clutch release fork on my gearbox was also busted. Here are the stuff i bought.

Above you can see the new clutch fork paired with the busted one. It was actually only the "tounge spring" thingy that was busted but since i will be using the gearbox for the engine conversion, i replaced it anyway. Next comes the engine mounting rubber. You can see the old one which was split in half. Oh and i couldn't get a pair, since Kumala only has one in stock.

Actually i bought more stuff in Kumala but that's for other post.
With me getting only one mounting rubber when two was needed, i headed on to other location called Pasar Mobil Kemayoran hoping to complete my list. I was a bit skeptical though, if the well-known Kumala was out of stock for engine mounts, i won't expect others to have it. But i was wrong, as i ended up getting these..

Other than the left engine mounting rubber, i got also a transmission mount. What bothers me is that i got the last engine mount for only a fifth of the price i paid Kumala! Granted Kumala did supply me original Japanese part and the last one was Thailand-made imitation, but here's another proof that i got ripped off by Kumala: the exact same clutch release fork was sold at around 20% cheaper! So i guess i was in some way lucky that Kumala ran out of engine mounts because if not, i might still got ripped off by it. So where did i get the last engine mounting rubber? Here you go.

Again, a small shop but it's a good option if you're looking for Charmant parts.
Other than those parts above, i got me some body parts. The first one was door weatherstrip for this part of the door:

I was told i need about 3 meters of weatherstrip for each door and as there was four doors, i got me 12 meters of it plus an extra 3 meters in case they f*ck up.

Here's how the weatherstrip looks like.

My battery turned out dead after nearly a year of no charging so i also bought brand new battery. I got the maintenance-free dry type and paid a good price since i also traded my old battery for it.

Lastly, i paid for these also.

A key set and engine hood support rubbers. Unfortunately, i can only use two from the three locks i got. Only the door locks fit. The one for the trunk didn't fit so i will have to use my old one which key was already different from the ignition key when i bought The Dog. This way, i'll have three keys for The Dog: ignition, door and trunk.
So, after the post-Christmas shopping i did, i now have three seller options if i need to get Charmant parts. I just have to call, asked for the price and went to the seller with best price. I guess i have to consider the rip-off by Kumala as my learning cost. In time, i will know which seller has the best price for any particular part i need.
Before last Christmas, i only knew one spare parts seller to supply my Charmant's needs which is Serimpi Motor. He was the seller that supplied me the head lamps, side lamps, etc. Since Charmants are so rare, i thought this seller was maybe like the one and only guy who sells Charmant parts. I was wrong.. I heard about another seller, Kumala Motor from a forum. This is a famous seller among retro car owners. Just like GI Joe, "When all else fails, he doesn't", Kumala Motor is the place to go when you've run out of places trying to get your hen's teeth part. So i decided to pay the seller a visit.. Kumala Motor is located in Krekot Jaya, quite a distance from home but for the sake of seeing in person this well-known seller, i went anyway.
Kumala is famous for selling very rare parts but also for the hefty price tag. Expect to see lineups of rare part hunters there too. After an hour drive, i finally get to see Kumala Motor. It didn't look like i what i had in mind. Maybe it was because i went there on Boxing Day, there weren't so many people shopping but the place was so small and cramped, you start to imagine how to fit many people inside on a busy day.
Just like Rosso and his bumblebee, one of my engine mounting rubbers was split in half and the other will also need replacing soon. Hence, a pair of engine mounting rubbers is on the shopping list. The clutch release fork on my gearbox was also busted. Here are the stuff i bought.
Above you can see the new clutch fork paired with the busted one. It was actually only the "tounge spring" thingy that was busted but since i will be using the gearbox for the engine conversion, i replaced it anyway. Next comes the engine mounting rubber. You can see the old one which was split in half. Oh and i couldn't get a pair, since Kumala only has one in stock.
Actually i bought more stuff in Kumala but that's for other post.
With me getting only one mounting rubber when two was needed, i headed on to other location called Pasar Mobil Kemayoran hoping to complete my list. I was a bit skeptical though, if the well-known Kumala was out of stock for engine mounts, i won't expect others to have it. But i was wrong, as i ended up getting these..
Other than the left engine mounting rubber, i got also a transmission mount. What bothers me is that i got the last engine mount for only a fifth of the price i paid Kumala! Granted Kumala did supply me original Japanese part and the last one was Thailand-made imitation, but here's another proof that i got ripped off by Kumala: the exact same clutch release fork was sold at around 20% cheaper! So i guess i was in some way lucky that Kumala ran out of engine mounts because if not, i might still got ripped off by it. So where did i get the last engine mounting rubber? Here you go.
Again, a small shop but it's a good option if you're looking for Charmant parts.
Other than those parts above, i got me some body parts. The first one was door weatherstrip for this part of the door:
I was told i need about 3 meters of weatherstrip for each door and as there was four doors, i got me 12 meters of it plus an extra 3 meters in case they f*ck up.
Here's how the weatherstrip looks like.
My battery turned out dead after nearly a year of no charging so i also bought brand new battery. I got the maintenance-free dry type and paid a good price since i also traded my old battery for it.
Lastly, i paid for these also.
A key set and engine hood support rubbers. Unfortunately, i can only use two from the three locks i got. Only the door locks fit. The one for the trunk didn't fit so i will have to use my old one which key was already different from the ignition key when i bought The Dog. This way, i'll have three keys for The Dog: ignition, door and trunk.
So, after the post-Christmas shopping i did, i now have three seller options if i need to get Charmant parts. I just have to call, asked for the price and went to the seller with best price. I guess i have to consider the rip-off by Kumala as my learning cost. In time, i will know which seller has the best price for any particular part i need.
Subscribe to:
Posts (Atom)