My 4A-GE comes with an internally-regulated alternator, IR alternator from now on. Having very few chances to see my Charmant, i thought it still has the stock alternator which is externally-regulated (ER) by a electromechanical cut-out regulator (the black box near your battery). Hence, i was prepared to convert my charging system to suit the engine's alternator.
Here's a picture of the cut-out regulator and engine bay fuse box. You'll fiddle with these two stuff on doing this conversion. Fortunately for me, i found out that the previous owned had replaced the alternator with an IR type so i was spared from having to figure out the charging system wiring. All there was left for me to do is extend the wires going to the alternator as it is now on the driver's side.
I won't discuss in detail about the ER alternator as i also have very few references about it. I don't even own a Charmant wiring diagram. (yes.. i would be in deep trouble if i actually had to convert from ER to IR). I will just jump to the IR system and tell you which wire to tap from the old system.
Here's an IR alternator charging system. Below is a Toyota charging system so i'll assume all IR alternators meant for Toyota models are using the same system. As can be seen from above pic, there are four pins that you need to figure out from your alternator: B, IG, S and L, respectively stand for Battery, Ignition, Sense and Lamp. Consecutively, you need to figure out which cable from your Charmant's stock system to be connected to these pins.
First, here's my alternator pinout. If you have the same alternator, lucky you. If not, google is your friend. Many people mistakenly assume that the large B lug on the alternator as the ground for the alternator and end up with a very expensive bonfire in their garage or at least, a glowing "ground" cable. Don't make the same mistake. B is in fact the alternator's charge output and should be connected to the battery. The ground is on the alternator body only so you won't need a dedicated ground cable for it. Just make sure you have a good ground loop on the engine block.
With the alternator side done, all that is left to do is figure out which wires on your Charmant to tap and connect to the alternator.
First, B should be connected to the battery. Your old alternator should have the B wire already. It's the thick wire approximately the diameter of your pinky.
IG can be tapped from from the ignition coil. It's the wire which connects to the (+) of the ignition coil. There maybe neater way to tap the ignition signal but this was how i found it on my car.
The rest, L and S are taken from the fuse box. Here are the wires that you need to tap. There you have it. Four wires to tap on your Charmant stock system and four pins to connect on your alternator. Connect these pairs together and you should be done. I admit there must be neater way to have this done. I am quite sure that S, IG and L can also be found on the cut-out regulator's connector. If they do, it's better to tap the wires there as they would be kept close together and easier to troubleshoot.
Excuse me for not actually showing you the conversion work. I am merely showing you how it was done on my Charmant which was working properly the last time it is running. I will take no liability if you anything goes wrong. Blame the guy who did the conversion on my car.
Finally made up my mind and went to pay the down-payment for a brand spankin' new Cusco LSD. With the Corona axle i just got, the only thing left is to get LSD. I hesitated a bit considering that LSDs aren't cheap but for the sake of having something to tell my children about (lol), i finally made the move.
The order was made yesterday and expected to arrive within 3-4 weeks. As my Corona axle is the same axle as Zenki AE86 (it better be, paying more for it than i paid for The Dog), i ordered the LSD for said model. Cusco have two types of LSD, RS-type and MZ-type. Basically what differentiates between the two is how the initial torque to activate the LSD is created. RS-type uses springs while MZ-type uses cone plates to create the initial torque. Here's a comparison pic between the two taken from Cusco's website. RS is said better suited for street while MS is for track. The RS is always engaged slightly due to the springs and provides a smooth transition from partially locked to fully locked and is much more predictible and controllable due to this fact. The MZ is torque engagement only and is noisier/less predictible. As it doesn't engage until you're on or off the throttle to engage the plates.
All of those words above are just theories for me until i get the actual item on my Charmant. Which one did i get? I took the RS-type simply because it's said to be less noisy, smoother and the clutches last longer.
Next, 1-way, 1.5-way or 2-way LSD? 1-way LSD locks only during acceleration, 1.5 fully locks on accel and slight locks on decel while 2-way fully locks both on accel and decel. There are four part numbers for RS-type Zenki AE86 LSD and they are: - LSD 130 F - LSD 130 F2 - LSD 130 L15 - LSD 130 L2 Just so you know, the part numbers for Kouki AE86 start with 131 instead of 130. Cusco LSD can be changed between two of the three "ways" options during overhaul and the four part numbers above tells you which combination of "ways" are possible. F is 1-way or 2-way and initially built as 1-way. F2 is like F only initially built as 2-way. L15 is 1.5 and 2-way and comes initially as 1.5 way and the last one, the one that i bought, is like 1.5-way and 2-way and initially built as 2-way. Nobody wants 1-way and 1.5 combination, i guess. I could be wrong about this as i derived this info myself from here. Somebody correct me if i am wrong. My reason for choosing 130 L2? None. I have no experience at all with LSD but i think i won't need 1-way. So it's either 1.5 way or 2-way for me and guessing that 2-way will be more predictable that 1.5-way made me choose L2 over L15.
This is what happens when you can't monitor your workshop frequently.. The progress will be irritatingly slow and they'll tell you tons of reasons that doesn't make any sense. Don't get me wrong, i am sure my engine swap workshop know their stuff but with all the work orders flowing in, infrequently monitored cars will be set aside and they'll focus on progressing others. Looks like i won't open up the name of my workshop then.. I wouldn't want others to experience the same thing. They won't need the extra publicity anyways. Most people have already heard of them. Anyway, here's the update.
Look at the custom gas cable bracket. That's all the progress they've achieved since my last visit to Jakarta on Feb 28th. Talking about stupid slow. There aren't many left to do but pending work will always be pending if they never get to it. What did i do when i was in Jakarta? I finished the alternator wiring. Found something interesting when i did the wiring. It turned out that my Charmant has got an alternator upgrade when i bought it. Stock Charmant alternators are externally regulated while the one on mine has been upgraded to internal regulator. This is good news because my 4A-GE comes with similar alternator. What's left for me to do is extend the plug wires because now 4A-GE alternator is placed on driver's side while 4A-C has it on passenger's side. I'll write about how to convert to internal regulator alternator on Charmants after this.
Finished the alternator wiring, I went to a second-hand parts seller and got this. Can't tell you how excited i was when i got it. That's a remote thermostat housing for 4A-GE and stuff like that are scarce here. I would need to order a new one if i want it as i am sure no shop would want to stock such slow moving part. I didn't think that i would ever get my hands on used one before and was ready to get my engine running without thermostat. You need thermostat to get the engine to the correct running temperature quickly. Without one, it would take longer time to, if ever, reach said temperature and engines in cold condition consume more fuel. Certainly this would help my mileage a lot.
I learned that the thermostat housing i got was not for AE92 4A-GE. Comparing it with the pic below (forgot where i found the pic), i learned that it was for AE82 4A-GE. If i am not mistaken, AE82 runs bigport 4A-GE while my engine is smallport. I can still use it since they're basically the same. Only the direction of some of the outlets are different. I also bought some EFI fuel and radiator hoses and managed to salvage the fuel filter of a Mercedes Benz C180 W202. This fuel filter would match my Bosch fuel pump perfectly. What's left to run the engine? As i said, not many. Fuel pump and fuel hose installation (which should take 2-3 hours max including fabricating the brackets), remote thermostat fitting (one day?), exhaust (one day?), tuning etc (one day?) and that's it i think. If my workshop actually work on my car, it would only take them less than a week to finish the car. We'll see how long it actually takes them.
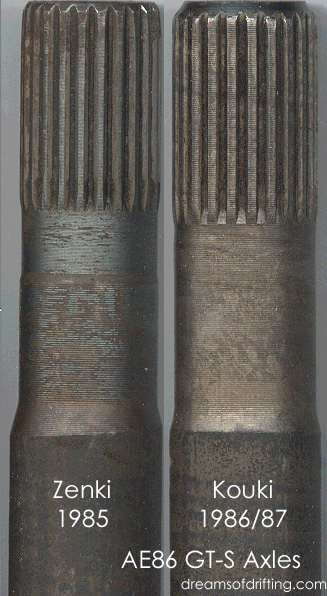
Title says it all. Just pulled out the rear axle off a scrapped Corona TT132 yesterday during Easter holidays. Looks like The Dog is getting an LSD after all. As you can see, it has all the marks of a T-series axle. 10 stud bolts on diff cover with one longer one. That's all the evidence? Of course not.. The axle is now being rebuilt and here is the axle shaft, pics taken by dad. See how the shaft is tapered twice as pointed by the arrows? Compare it with this pic of AE86 zenki shaft on the left. Though one of the tapers are on different positions, this is one evidence that it isn't a Kouki axle. Last pic below should clear all doubts. You do know that Zenki axle-shafts are 24mm in diameter while Kouki's are 1-1.5 mm bigger, don't you? Here you go. As i am now back to work in Lampung, tomorrow dad will help me check if this shaft fits the Cusco LSD offered by my workshop. If it does, i just saved weeks of shipping period but if it doesn't, then i'll be getting a brand new Cusco LSD ordered from Japan.
Here are some comparison pics i took. Keep in mind that my A55 Charmant is 4A-C and S-series axle equipped. One thing that bothers me on the comparison pics above is that Corona's propeller shaft is 3 cm longer than Charmants (1240 vs 1210 mm). I am under the impression that T-series diff cover nose are longer than S-series on our Charmant and subsequently the propeller shaft on Corona should be shorter. Well, i do have to consider the gearbox position, wheelbase and all but until i get to actually install the Corona axle on my Charmant, i can only guess that i need to shorten the Charmant stock propshaft. Can anybody enlighten me on this?
***update*** The Corona halfshaft didn't fit the Cusco LSD offered. I've already guessed it. I just need the confirmation. They offered me Cusco LSD part number 131F2 while the one for Zenki (and my Corona axle) has to start with 130 (like 130F2). I guess i'll be getting a brand new LSD after all.. *peeks inside wallet* Meanwhile, here's my Corona axle being rebuilt.
Familiar with this monster? Nice huh? Super Silhoutte R30 Skyline. I gotta say i prefer R30s more than the later generations of Skyline. There's something about the angled body design that really gets to me.
What do you do when you want a ride like that so bad but just don't have enough dough for R30s? You could get an MX6.. and turn it into this.. LOL got some time on my hands and decided to waste it on realizing an idea that has been floating in my head for some time. I am just imagining what my next project would be if i have the money and seeing this result, i gotta say it would make a very nice project. Sad that MX6s are FWD..
Learning new stuff is one of the pleasures of this project. I learned a bit about importing stuff when i bought my Prothane kit last time. There are import taxes that i need to settle by picking up the stuff at the post office myself. But that's for stuff worth over US$50. What about things cheaper? Other than that, i heard that used stuff are also not allowed at the customs.
Curious about learning the actual facts, i went again searching on Ebay for parts at said conditions: previously owned and priced under US$50. Here's what interest me the most. That's used 4AGE injector plugs. Why did i choose that? I already have injector plugs on my DIY harness but somehow they're of a different type. The ones i have got no clips to fix the plugs securely to the injectors. That's nothing cable ties couldn't solve but since these are for sale (and cheap), i chose to get them anyway. I paid only 15 bucks shipped. So there you go.. Used stuff for less than US$50.
How did it go? Well just a few days ago, this was delivered. Yes it's actually delivered. I don't have to pick it up at the post office to pay for the import tax. There was a fee that i had to pay when the stuff was delivered home but it was less than a dollar.
In total, i was only paying around US$16 for those plugs. I am pretty sure i'd be paying more if i buy them locally, that's if i can find them. Who says imported stuff are always more expensive?
What did we learn, ladies and gentlemen? Stuff worth less than US$50 will be actually be delivered by the post office while anything more expensive, will have to picked up by the recipient since he/she has to settle some import taxes. Used stuff are also allowed!
Ebay is becoming more as my daily stop lately. I am eyeing on some adjustable cam sprockets and lightweight pulleys currently. Who knows when a good bargain comes up..
On my search for the ultimate suspension setup, i have come across a variety of options to choose. What makes the journey easier is that Charmant has the exact suspension system with AE86 (i've been saying this over and over, i guess you got bored with it, eh?) and there's an extensive list of aftermarket suspension parts for said model.
My priorities in no particular order when it comes to suspension setup are: - Performance - Long-term cost - Initial price
In short, i want a suspension system which performs well which is cheap enough and allows me to keep running it with as minimum of maintenance cost as possible. Well, don't we all?
You see, i don't really care if it's adjustable-height coilover or not. I don't think i'll change the height often enough to justify me a purchase. However, if there's a system which fulfills said priorities, why not? Here's some of the options i found so far..
Taiwanese Coil-overs You know, D2 Racing, Ksport, G4 Racing or the sorts. Of course i can be wrong when i say that those brands are actually made in Taiwan but i am just channeling what hundreds have said on many web forums. Their coil-overs are ridiculously cheap. I got an offer for Ksport's cheapest AE86 coilover line Kontrol Pro for less than a thousand dollars!
Those brands look like they come from one manufacturer in Taiwan. They look very much alike except for the color. Don't believe me? Here you go. Above is Ksport and below is D2. I am sure someone with adequate photoshop skills (and time) can alter Ksport's orange color to purple and end up with similar looking kit with D2.
A coilover for less than a grand?! So what's keeping me from buying them? Notice the rear shocks on these kits and compare it with Charmant's stock ones. One major drawback that's keeping me from these kits is how they now combine the springs with the damper while on the stock system, the springs and dampers are separated. On the stock system, the vehicle's weight is exerted on the spring perches and mounts that is designed and meant to hold such load. Since these kits now combine the spring with the damper, the load would now be on the damper mounts. That doesn't sound as a good idea for me. The top damper mount on the chassis is not what worries me. It's actually the lower mount on the axle which got me scared. See here.. I am no expert in metallurgic but i am not comfortable putting such weight on a very small shock mount. However, Yohann has been using D2 with no problem. So it's now up to you whether you want this kit or not. One good point to note about these kits is that you keep the stock strut case and no altering is needed to be done. The front dampers which come with the kit slide inside the strut case while the adjustable sleeves sit on top of the stock spring perches. Also, they come with monotube dampers which is said to outperform twintube dampers.
In case you're wondering, the stock Charmant strut case is integrated with the spindle (the shaft where your disk brake and wheel spin) as seen below. This means, any coilover kit manufacturer must figure out a way to fit spindles on their kit. It can either be from making their own spindles (like in Greddy Type-S kit) or somehow fit the stock spindles on the kit (by keeping the stock strut case ala Ksport/D2 or modifying the strut case). I personally prefer a kit which keeps the stock strut case as usually it's the cheap and allows you to use other brand of strut inserts (dampers) such as the way Ksport or D2 do above. A kit which comes with their own spindle can be very expensive and while ensures you easy installation, leaves you with a question of whether can you use any strut inserts on the kit.
JDM Coilovers Shiny, top notch performance and expensive are the treats of these coilovers. Greddy Type-S and Tein SS-P both retail at around US$2,000. With shipping and tax, i'll be paying close to US$3,000 for these kits and that's nearly half of what i've spent on The Dog so far. LOL.
While i am sure the kit is certainly worth the price, i just don't have the budget (and sanity) to shell out that kind of money when i have no plans to use The Dog as a dedicated track ride. Pictured below is Greddy Type-S taken from a very good review of them here. You can see that they come with spindles so you can ditch those stock strut cases or use them as dildos if you prefer. Look how they also keep the rear springs separated from the dampers which ensures you that the load is where it was designed to be.
Megan Coilovers Megan coilovers could be just another Taiwanese coilover. However, i chose to write about them separately to share you a unique thing i learned about them. Here's their kit. First you'll notice that on the rear, they did it Greddy style as the springs and dampers are kept separated. This is certainly a good decision. However, pay attention to the front parts. See that they have the brake cable mounts? That tells you that these are not meant to slide inside the stock strut case i.e the strut case is also provided on the kit. But where are the spindles? This is what i am going to share about this kit. Taken from Megan's website:
These dampers are NOT a Direct Bolt-On, however, because you need to Re-Use your OEM front spindles. We did this to maintain a lower cost for the enthusiast, as the OEM spindles are perfectly able to be reused in most cases. The operation is simple and most shops that have the ability to weld using either a MIG or TIG welder can complete the operation in usually under an hour.
After removing your front Shock casings with the spindles, mark off 40mm from the top of the spindle base and cut. Once you have the spindles with 40mm of tubing protruding from them, simply slide the Megan Casings over the shock casings until they are butted up against the spindle casting, and simply weld COMPLETELY around the casing with either a MIG or TIG welder (NOT AN ARC WELDER!!!). Once this is done, simply screw on the bottom bracket onto the suspension system and you are ready to go reassemble your front suspension.
So basically you need to cut your stock strut case keeping the spindle part and weld the kit's front dampers on it. Though simple, it sounds like a risky job to me. If I am going to pay a thousand dollars for a coilover kit, i certainly don't like that it comes with a risk of messed up welding process which leaves you with a useless kit.
Short Stroke Conversion I won't bother you with details. See here.
This is basically modding your stock strut cases by shortening them to fit shorter stroke strut inserts, cutting the spring perches to allow adjustable perch sleeves to be welded over the strut case.
You'll need to get short stroke dampers, adjustable sleeves and springs (Ground Control Coilover kit is a good idea) and adjustable camber top mounts. These alone would cost me at least a grand. I still have to pay for the conversion work and still left with the stock suspension on the rear. Being sure that this would outperform any Taiwanese coilovers mentioned above, I was going to pick this option until i found another option below.
Hotbits Coilovers My good friend Stanley might have heard about them as the manufacturer is based in Malaysia (if you do, share us about it, will you Stanley?). Hotbits have a few options for AE86. The first one is monotube shock dampers that requires you to reuse the old springs and are non-adjustable height. The second one is coilover kit that you can upgrade as you and your wallet allow. The basic coilover kit comes with non-adjustable monotube dampers with adjustable height. For extra, you can either get a one-way or two-way adjustable dampers. One-way adjustable dampers allow you to adjust the compression and rebound damping rate simultaneously. This is called the DT1 series. Two-way adjustable dampers allow you to separately adjust said damping rates and known as the DT2 series. Need more? How about progressive springs (known as helper springs by Hotbits)? Separate canisters on the dampers? Adjustable camber top mounts? These will be added to the kit if you're willing to shell out extra.
What i like about them is that they are rebuild-able meaning that you don't have get new dampers when the old ones are busted. You just take the old ones to a certified Hot Bits service center and they'll renew your old dampers. The rebuild cost is of course much cheaper than getting new dampers and guess what, we have a certified distributor in Indonesia!
I am still currently corresponding with our local Hot Bits distributor, digging out information about their AE86 coilover kit. So far i have been told that they don't have any stock in Indonesia and need to order from Malaysia. Also i was told that the rear springs are kept separated from the shocks (sweet!). However, they have no pics of the actual AE86 coilover kit so i can't tell how they do it for the front part. I sure hope that the kit comes with their own spindle like Greddy but i can only guess until i get a reply from them. Will update this post when i have more info.
The basic coilover kit (non-adjustable rate damper, no adjustable camber top mounts and no helper springs) cost me pretty much the same as Taiwanese coilovers. So you can see why i am so eager to know more about this kit. The three priorities i mentioned earlier in this post are fulfilled by Hot Bits. Cheap initial price, low long term cost (rebuild-able dampers yo!) and good performance. Well i can't really say much about performance yet but testimonies from other Hot Bits user in Indonesia promise me a satisfactory purchase so if everything goes well, most probably i'll invest in one of their kits.

 Fortunately for me, i found out that the previous owned had replaced the alternator with an IR type so i was spared from having to figure out the charging system wiring. All there was left for me to do is extend the wires going to the alternator as it is now on the driver's side.
 As can be seen from above pic, there are four pins that you need to figure out from your alternator: B, IG, S and L, respectively stand for Battery, Ignition, Sense and Lamp. Consecutively, you need to figure out which cable from your Charmant's stock system to be connected to these pins.
 Many people mistakenly assume that the large B lug on the alternator as the ground for the alternator and end up with a very expensive bonfire in their garage or at least, a glowing "ground" cable. Don't make the same mistake. B is in fact the alternator's charge output and should be connected to the battery. The ground is on the alternator body only so you won't need a dedicated ground cable for it. Just make sure you have a good ground loop on the engine block.
 There you have it. Four wires to tap on your Charmant stock system and four pins to connect on your alternator. Connect these pairs together and you should be done. I admit there must be neater way to have this done. I am quite sure that S, IG and L can also be found on the cut-out regulator's connector. If they do, it's better to tap the wires there as they would be kept close together and easier to troubleshoot.